Open topic with navigation
Create Children's Rooms/Locations
Creating rooms/locations (RLCs) step is critical for Check-in and for easily communicating with all age groups. RLCs are where a child is assigned and where all attendance for a child will be tracked.
One thing you will notice is that when creating RLCs, you are able to override settings that you made when you created the activity. This is where you will specify a particular age range for a single RLC ensuring that the only children that get checked into a room are actually the correct age.
To create Rooms & Locations:
- Click Ministry > Activity/Room Setup > Rooms & Locations. The Add/Edit Room, Location, Class form appears. Ensure the children's service activity is displayed before you begin completing the fields. If the activity is not displayed, check the Ministry selection at the top of the screen and the Show activity drop-down list at the bottom of the page.
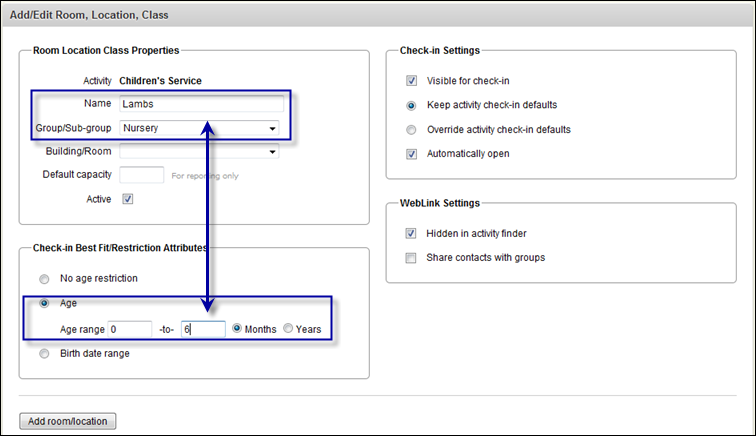
- In the Room Location Class Properties box, type Lambs in the Name field. (Obviously, you may change the names in this example to names that match your ministry as necessary.) The name of the RLC will print out on the name tag.
- Select Nursery from the Group/Sub-group drop-down list.
- In the Check-in Best Fit/Restriction Attributes box, select the Age option. Type 0 to 6 and select Months.
 Your screen should look like this

- Click Add Room/Location.
- Repeat steps 2-5 for the following:
- Ladybugs - select the Nursery group and age range 6 - 12 months
- Ducks - select the Nursery group and age range 12 - 18 months
- Rabbits - select the Nursery group and age range 18 - 24 months
- Twos - select the Pre-School group and age range 2 to 2 years
- Threes - select the Pre-School group and age range 3 to 3 years
- Pre-K - select the Pre-School group and age range 4 to 5.
- Kindergarten - select the Elementary group and age range 5 to 6 years
- 1st Grade - select the Elementary group and age range 6 to 7 years
- 2nd Grade - select the Elementary group and age range 7 to 8 years
- 3rd Grade - select the Elementary group and age range 8 to 9 years
- 4th Grade - select the Elementary group and age range 9 to 10 years
- 5th Grade - select the Elementary group and age range 10 to 11 years
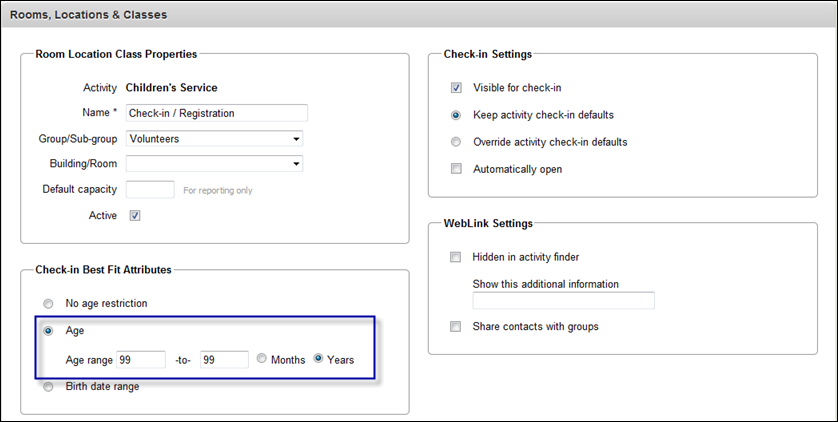
- Type Check-in / Registration in the Name field and select Volunteers from the Group/Sub-group drop-down list.
- In the Check-in Best Fit/Restrictions box, select Age and type 99 to 99 and select Years. This prevents adults (or anyone) who does not have an assignment from accidentally checking into this room.
 Your screen should look like this

- Click Add room/location.
- Repeat steps 7-9 for the Hall Monitor volunteer job.
Go to next step
![]() Your screen should look like this
Your screen should look like this![]() Your screen should look like this
Your screen should look like this
